Thursday, December 22, 2011

Nokia Ovi is Change to Nokia Suite

Nokia Suite is a free software that connects your Nokia phone and Windows PC, and helps you transfer content between the two. With Nokia Nokia Suite you can use your PC to get software updates for your phone, back up your data, get new street maps and synchronise your music, photos and contacts. Compatible with PC Windows 7, Vista, or XP.
Nokia Suite
Version 3.2 | Microsoft Windows | Application | 87.5 MB | English
Move photos, videos, music and more between your phone and computer with Nokia Suite. You can also get software updates for your phone, back up your data, and download apps, music, and free street maps.
Mac user? No problem. Keep your calendar and contacts up to date on your phone and Mac with iSync. To get iSync, first select your phone on the left.
Download For Windows
Multimedia Transfer for Mac OS 10.5 and 10.6
Multimedia Transfer for Mac OS 10.4
ISync for MAC OS


Saturday, December 10, 2011

WMP 12 back Ground Changer

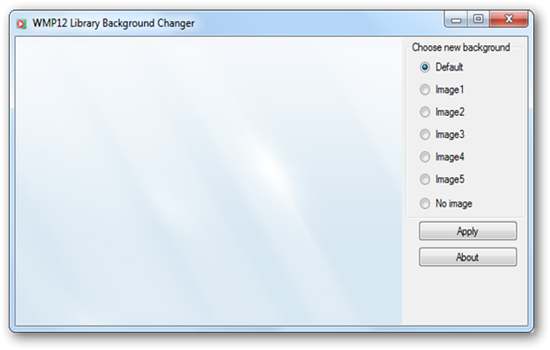
WMP12 Library Background Changer is a free portable tool that allows you to change the librarybackground of Windows Media Player 12 (WMP12) to 6 different backgrounds or no background with one click.
How To Use:
Just run the tool, select your desired image and click Apply. It will apply the changes immediately.
WMP12LBC

Sunday, October 23, 2011

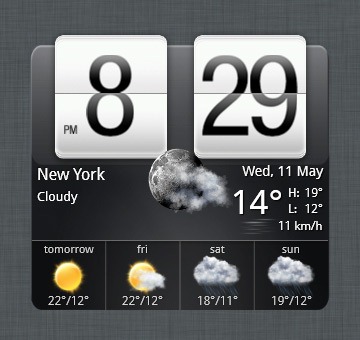
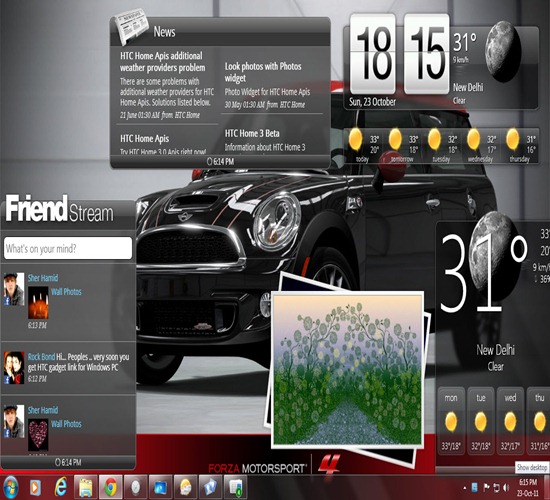
HTC Home Apis–Desktop Gadgets

Try the new version of HTC Home right now!
New version comes new look and features. Now each version has own name since this. Apis is the name of 3.0
HTC GADGETS
scrn1

Download:-
System Requirements:-
  • PC with Windows Vista or Windows 7 (32 or 64-bit operation systems).
  • Internet connection (also possible through proxy-server)
  • Installed Microsoft.NET Framework 4
  • WinRar or 7-Zip archiver to unpack the portable version
More downloads
Version changes
  • All updates since release included
Technical information
  • 3.0 Build 621 version
  • File sized 10Mb
  • Release date: 2011-06-21

Home Page:-
Extras:-
Bonus Download:-


PC Hardware Tips by RoYStaR


Download Book:-

Keeping Your Computer Cool: Three Things to Avoid
If you run your computer hard and fast, you will eventually experience overheating problems. Overly Busy computer components give off more heat than those that are running fewer processes. Overheating issues can be minimized if you avoid these three commonplace scenarios which aggravate the buildup of heat within your computer system.
Blocked Air Vents
Do not block the air vents around your computer case. Air is as important for us humans as it is for computers. Hot computer components need properly circulated air to cool off faster. To promote the exchange of air between your system and the outside environment, avoid pressing your computer case against the wall or stacking books and papers beside your case. Keep the air vents fully exposed so your computer can breathe without difficulty.
Unnecessary Applications
Do not run unnecessary software applications. Managing too many programs causes your computer components to work harder and give off more heat. Close the applications that you do not need and simply run those that require your immediate attention. You will not be able to work on more than two or three applications at a time anyway. Computers need a break too.
Overclocking
Avoid pushing your central processing unit (CPU) beyond its specified clock rate to boost your computer’s performance. An overclocked CPU gives off a lot of heat and you will need to employ advanced cooling solutions to keep your CPU from melting. If you really need a faster computer, do not push your CPU to its limits. Instead, buy a faster CPU or increase your random access memory (RAM). Note that overclocking your CPU will shorten its lifespan and void its warranty.
Three Tips to Keep Your Desktop Computer Cool
Are you concerned over the amount of heat your desktop computer is generating? Heat is a common by-product of a running computer. Your desktop is designed to operate at certain levels both below and above normal room temperature. If your desktop computer gets too hot, however, you are in for disaster. There are three things that you can do to curtail dangerously high computer temperatures.
Thermal Compound
Use a thermal compound to fully join the central processing unit (CPU) to the heat sink. Although the CPU is connected to the heat sink, there are air holes in between the irregular surfaces of the two components. Thermal compounds or thermal pastes conduct heat faster than air.
Filling in the gaps with a thermal compound will aid the heat sink in drawing heat away from the CPU.
Additional Fans
Better airflow can accelerate the rate at which internal computer components cool. To enhance airflow, install additional fans inside your computer case. You can strategically place the fans such that cool outside air is sucked inside one side of the computer case, while hot internal air is expelled through a different side.
Water Cooling
For serious overheating issues, you may want to consider water cooling. This involves running water through cables looped inside your computer case. Liquids are better at absorbing heat than air; thus, a water cooling system can control computer temperatures more effectively than internal fans.
Some people are hesitant to try out water cooling due to the risk of water leaks. Should a leak occur, your computer will be short-circuited in moments. Water cooling is also very costly.
In most cases, proper ventilation is enough to keep a computer cool and away from overheating problems. Should you want a really cool PC though, you will have to look into water cooling and the risks and costs associated with this relatively novel cooling system.
Motherboard Cleaning Tips
Motherboard is the main part of your computer that contains all hardware components. Your computer motherboard could fry, if you do not keep it clean on periodically basis. Dust is the main cause to heat up your system and heat link to hardware failure. You can save your computer maintenance cost if you clean your computer on the regular basis. This will improve the cooling and performance of the motherboard components.
To clean your motherboard first unplugs your system power from the electrical outlet.
Using the screwdriver remove the side covers of your computer case and put them to one side.
Check all data and power cables connections. Inspect all motherboard PCI and AGP slots.
Remove all add-on card of your motherboard for example RAM, modem, VGA, sound card and LAN card.
Now blow the air around all the motherboard sides and keeping away your blower nozzle 4 to 5 inches away from main board components. You can use vacuum cleaner also for this purpose but compressed air is the better solution to clean a system.
At the end assemble back all cards, cables and side covers of your system.
I recommend you doing this after every three months if you want to save your system life.


FOR GAMERS:-
14 Tips for Assembling your Custom PC
Dedicated PC gamers will eventually want to build their own gaming system from scratch. Not only is it less expensive than buying a stock system, but you can also make it exactly as powerful as you want. A custom system has many advantages over stock PCs, but there’s one major disadvantage: the time and expertise required to assemble the computer.
That’s where this article comes in. I won’t go into details about how to actually assemble your PC, but I’ll give you a number of tips to avoid rookie mistakes and speed up the building process to get on to the good part: gaming on your brand new, custom rig!
Don’t worry, it might seem like an overwhelming job at first, but once you get at it – there really is nothing to it.
1. Hardware compatibility
Before you can actually start putting together your system, you’ll first want to pick and order the appropriate hardware to build it with. It’s crucial that you select a motherboard which is compatible with the processor you choose. The sockets need to match, so if you get a socket 775 processor (e.g.: Intel Core 2 Quad Q9400) then you’ll need a socket 775 motherboard to go with it. Varying sockets are generally not compatible. Likewise you’ll want to use DDR3 RAM modules on DDR3 compatible motherboards only. You can’t use them on DDR2 motherboards and likewise you’d do well to steer clear of DDR2 modules when purchasing newer DDR3 compatible motherboards.
This information should all be listed on whatever computer site you’re browsing for hardware selection.
2. Team up
Get help if you do not feel confident assembling a PC by yourself? There’s bound to be someone you know who has experience building a PC from the ground up. And if there isn’t, then you can probably let the store itself assemble it for you. This might cost a little bit extra, but you’ll still have your custom rig and you won’t have to worry about messing anything up yourself.
3. Powering the system
Those ‘recommended power supply’ values you’ll find for video cards presume that you pick a top quality brand. Don’t underestimate the importance of your power supply unit!
If you’re planning to add extra equipment to your system, like additional hard disks, controllers, extensive sound systems, etc. then you’ll want an increasingly powerful power supply to go with it. So make sure you get something with high efficiency ratings (80% or higher) and a bit more wattage than required.
When your video card is recommended for use with 450 Watt, then you should get at least 520 Watt, more if you intend to use a lot of accessories. A useful website for picking a proper power supply is SLI Zone. They’re NVidia-focused, but if they recommend it then it definitely works well. Antec, Corsair and Enermax are generally high quality brands for power supplies.


4. Separating the audio
Onboard audio is pretty decent nowadays and a separate soundcard is generally a waste of money. So don’t purchase a soundcard unless you actually experience problems with your onboard soundcard. If you hear popping sounds or suffer poor quality audio, then you’ll want to look into some separate hardware solutions. It’s also a good idea to get a quality soundcard when you often work with audio or have a high quality speaker set. Keep in mind that if you’re an average gamer, then the added cost of a soundcard far outweighs its minimal advantages. You can always add one later on if you want to.
5. Memory overkill
Always keep in mind which operating system you’re going to use before you decide how much RAM (system memory) you’re going to purchase. A 32-bit operating system will not support more than 4GB of system memory. In fact, it’ll probably only see a little over 3GB. Current games aren’t designed to make proper use of more than 4GB of RAM either and 64-bit operating systems still aren’t quite as well-supported as 32-bit OS’s, so for now you’re probably best of using a 32-bit OS with 3-4GB RAM. You shouldn’t overestimate the effect of higher memory clocks either. Lower latencies can matter, but higher memory clocks have exactly zero effect in games. As long as you get 800mhz (PC6400) or higher RAM modules, you’ll be just as well off as the guy with overclocked – and overpriced – DDR3 memory.
6. Practicality trumps beauty
Buy the most practical case, not the prettiest. If you’re going to go attend a lot of LAN parties, then you want to get something lightweight, preferably aluminum. If you’re going to require a lot of storage capacity, then get a sizable case with plenty of room for hard disks (3,5″ slots). If your video card is going to run hot (high-end video cards generally) then get a case with plenty of 120mm fans and good airflow. If you don’t know what brand to get, Antec cases are always good. It’s always important to have a proper cooling setup (not just big fans, but good internal airflow as well) in your case, because gaming PCs tend to run a little hotter than your average computer.
7. Custom cooling
Don’t buy separate cooling systems for your processor, video card or computer case. All your component will come with stock coolers that should suffice in any ordinary situation. Adding custom coolers onto your hardware is something you do if you want to start overclocking, which isn’t really what a newbie PC builder should be doing. If you really do want overclocked components as a beginner then you can buy them factory overclocked and they’ll generally come with coolers designed to handle the extra heat.
8. SATA trumps IDE
Always go for SATA hard disks and DVD players/burners. SATA refers to the connector used for these components. It’s predecessor is the older, flat cable, IDE connector. You don’t want these IDE versions, because they’re outdated and generally not any less expensive. Your new motherboard is also likely to contain more SATA connectors than IDE ones, if it even has any IDE connectors, so you’ll want to use SATA components anyway.
9. Names can be tricky
Don’t let the confusing naming of hardware components fool you into buying an inferior product. Frequently higher model numbers do not actually result in better performance. You’ll be best served by checking the performance of video cards and processors before purchasing them, by googling the model number and ‘benchmarks’ or ‘reviews’. Some sites that offer these are Tom’s Hardware, FiringSquad and AnandTech. It’s also a good idea to look around for recently updated PC assembly articles, which detail the best components for gaming PCs in the current month/quarter. Many sites offer these kinds of articles.
You might find a Geforce 9600GT for example and think it’s faster than a Geforce 8800GTX. In actual fact the 8800GTX is a much more capable video card.
10. SLI sound cool, but frequently isn’t
You may have heard of SLI setups and video cards which actually consist of two video cards in one. These setups may sound intriguing and powerful, but they come with a significant downside: frequent incompatibility. Many are the stories of gamers with SLI/Crossfire cards who had worse performance than gamers with budget cards in the very latest games, until a patch weeks later fixed it (if it ever even does). In a great number of games the performance of these setups is undeniably superior to single card systems, but is it worth the cost of not being able to play many recent (and older) games as well as less expensive PCs? It’s your call to make.
11. Standard is better than uncommon
You’d do well to go for components that are popular amongst fellow gamers. Take components from well-known brands and use frequently used model motherboards, processors and video cards. This is important for game compatibility. Having more common system specifications greatly reduces your chances of running into hardware-related bugs in games, because your hardware combination is more likely to be tested. You can easily see which components are popular by having a look at the Steam Hardware Survey. Right now the 8800-series video cards and Intel Core 2 Duo’s are the most popular components.
12. Be careful
Many computer components are fragile, so be careful when putting your PC together. It’ll usually be destroyed if you let it slip out of your hands and all hardware components get ruined by static electricity. So ground yourself before touching video cards, memory modules, hard disks, etc. Don’t be too rough when inserting your components onto your motherboard either. It may take a bit of force every now and then, but your motherboard can break and you won’t be happy if it does.
13. Don’t rush it
It’s important to take your time when assembling your system. Consult the manuals that came with your components. Your motherboard’s manual should contain easy-to-understand step-by-step overviews of what to do to get your system running, so read it. You don’t want to screw this part up. Even when selecting your components it’s a good idea to take things slow. Sleep a few nights over what components to purchase and weigh the benefits of having the best-of-the-best hardware, or a little more money to spend on accessories (controllers, monitor, and speakers) or games.
14. Keep it clean
After your PC has been running for a while it will inevitably start to gather dust internally. This won’t have an effect initially, but over time your PC will run hotter and might suffer a little in the performance department.
So generally a good idea to use your vacuum cleaner to carefully remove most of the dust that collects inside your case every 6 months or so.
The same goes for your hard disk. Run frequent defragmentation’s – preferably immediately after installing a game – and use tools such as CCleaner to keep your computer tidy.
Concluding
I hope these tips help you to get into assembling that first custom PC a little more securely. This may not be a foolproof guide to actually building the thing, but hopefully it has a few pointers you’ll find useful when the time comes.
Download Book:-
Thursday, September 1, 2011

6 Glass Gadgets For Windows 7

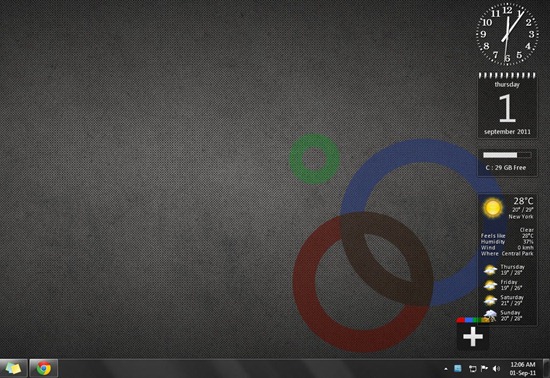
There is 6 Glass Gadgets For Windows 7 is available. I am download it from other soure and try on my desktop. Its working perfectly on Windows 7 X64 edition.
The installation is simple and will not replace your current gadgets. It will add 6 more gadgets in your gadget windows.
Screen Shot
Screen
Torrent Download Link:-
http://thepiratebay.org/torrent/6643813/6_Glass_Gadget_for_Windows_7_by_RoYStaR
Download Links:-
http://www.mediafire.com/?wizum412spudi8d

http://ge.tt/8uGAMK7?c 
Bonus Gadgets for you (Not Tested by ME, so no guarantee from my side its working or not): -http://www.filesonic.com/file/1684788604/Gadgets_2011.rar

http://www.wupload.com/file/101671518/Gadgets_2011.rar
16 More Glass Gadgets (Not Tested by ME, so no guarantee from my side its working or not): -http://hotfile.com/dl/80294393/bba6507/GlassG.rar.html

http://www.filesonic.com/file/29435639/GlassG.rar

Thursday, July 28, 2011

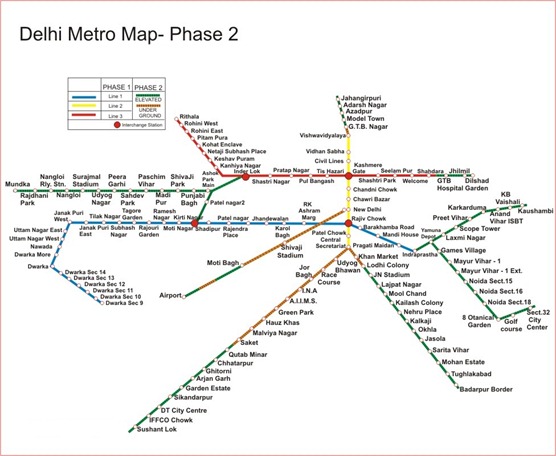
Delhi Metro Route Map

The Delhi Metro (Hindi: दिल्ली मेट्रो DillÄ« Meá¹­ro) is a rapid transit system serving Delhi, Gurgaon, Noida and Ghaziabad in the National Capital Region of India. The network consists of six lines with a total length of 189.63 kilometres (117.83 mi) with 142 stations of which 35 are underground. It has a combination of elevated, at-grade and underground lines and uses both broad gauge and standard gauge rolling stock. Its overhead rapid transit and the are 3 trains: Mitsubishi-ROTEM Broad gauge,Bombardier MOVIA,Mitsubishi-ROTEM Standard gauge.
Delhi Metro is being built and operated by the Delhi Metro Rail Corporation Limited (DMRC). As of November 2010, DMRC operates around 2,700 trips daily between 6:00 and 23:00 running with an interval of 2.5 minutes between trains at peak frequency.
The trains are mainly of four coaches, but due to increase in passengers numbers, six-coach trains are also added on red line (Dilshad Garden to Rithala), Yellow Line (Jahangirpuri to HUDA city centre), Blue Line (Dwarka sec -21 to Vaishali/NOIDA city centre) on the network . The power output is supplied by 25-kilovolt, 50 Hertz alternating currentthrough overhead catenary. The metro has an average daily ridership of 1.6 million commuters, and, as of June 2011, had carried over 1.25 billion commuters since its inception.
Planning for the metro started in 1984, when the Delhi Development Authority and the Urban Arts Commission came up with a proposal for developing a multi-modal transport system for the city. The Government of India and the Government of Delhi jointly set up the Delhi Metro Rail Corporation (DMRC) in 1995. Construction started in 1998, and the first section, on the Red Line, opened in 2002, followed by the Yellow Line in 2004, the Blue Line in 2005, its branch line in 2009, the Green and Violet Lines in 2010 and the Delhi Airport Metro Express in 2011.
Delhi Metro’s Website:-http://www.delhimetrorail.com/
You can get there information in details about stations, fares and other facilities provided by metro authorities.
For Complaints:-Complaint on vigilance matters related to DMRC can be made by anybody as this forms the main source of Information related to corruption. According to the instructions of CVC, anonymous / pseudonymous complaints are not entertained. The signed complaints can be handed over personally / can be sent by post to vigilance functionaries or e-mail to vigilance@dmrc.org or cvodmrc@gmail.com.


Wednesday, July 20, 2011

Toll Free Phone Numbers

Airlines Toll Free Phone Numbers :Tollfree Numbers Indian Airlines – 1800 180 1407
Jet Airways – 1800 22 5522
Spice Jet – 1800 180 3333
Air India — 1800 22 7722
Kingfisher – 1800 180 0101

Automobiles Toll Free Phone Numbers :Mahindra Scorpio – 1800 22 6006
Maruti – 1800 111 515
Tata Motors – 1800 22 5552
Windshield Experts – 1800 11 3636

Banks Toll Free Phone Numbers :
ABN AMRO – 1800 11 2224
Canara Bank – 1800 44 6000
Citibank – 1800 44 2265
Corporation Bank – 1800 443 555
Development Credit Bank – 1800 22 5769
HDFC Bank – 1800 227 227
ICICI Bank – 1800 333 499
ICICI Bank NRI – 1800 22 4848
IDBI Bank – 1800 11 6999
Indian Bank – 1800 425 1400
ING Vysya – 1800 44 9900
Kotak Mahindra Bank – 1800 22 6022
Lord Krishna Bank – 1800 11 2300
Punjab National Bank – 1800 122 222
State Bank of India – 1800 44 1955
Syndicate Bank – 1800 44 6655

Cell Phones Toll Free Phone Numbers :
BenQ – 1800 22 08 08
Bird Cellphones – 1800 11 7700
Motorola Moto Assist – 1800 11 1211
Nokia – 3030 3838
Sony Ericsson – 3901 1111

Computers/IT Toll Free Phone Numbers :Adrenalin – 1800 444 445
AMD – 1800 425 6664
Apple Computers – 1800 444 683
Canon – 1800 333 366
Cisco Systems – 1800 221 777
Compaq – HP – 1800 444 999
Data One Broadband – 1800 424 1800
Dell – 1800 444 026
Epson – 1800 44 0011
eSys – 3970 0011
Genesis Tally Academy – 1800 444 888
HCL – 1800 180 8080
IBM – 1800 443 333
Lexmark – 1800 22 4477
Marshal’s Point – 1800 33 4488
Microsoft – 1800 111 100
Microsoft Virus Update – 1901 333 334
Seagate – 1800 180 1104
Symantec – 1800 44 5533
TVS Electronics – 1800 444 566
WeP Peripherals – 1800 44 6446
Wipro – 1800 333 312
Xerox – 1800 180 1225
Zenith – 1800 222 004

Couriers/Packers & Movers Toll Free Phone Numbers :ABT Courier – 1800 44 8585
AFL Wizz – 1800 22 9696
Agarwal Packers & Movers – 1800 11 4321
Associated Packers P Ltd – 1800 21 4560
DHL – 1800 111 345
FedEx – 1800 22 6161
Goel Packers & Movers – 1800 11 3456
UPS – 1800 22 7171

Education Toll Free Phone Numbers :
Edu Plus – 1800 444 000
Hindustan College – 1800 33 4438
NCERT – 1800 11 1265
Vellore Institute of Technology – 1800 441 555
Amity University NCR Delhi – 1800 110 000

Healthcare Toll Free Phone Numbers :
Best on Health – 1800 11 8899
Dr Batras – 1800 11 6767
GlaxoSmithKline – 1800 22 8797
Johnson & Johnson – 1800 22 8111
Kaya Skin Clinic – 1800 22 5292
LifeCell – 1800 44 5323
Manmar Technologies – 1800 33 4420
Pfizer – 1800 442 442
Roche Accu-Chek – 1800 11 45 46
Rudraksha – 1800 21 4708
Varilux Lenses – 1800 44 8383
VLCC – 1800 33 1262

Home Appliances Toll Free Phone Numbers :
Aiwa/Sony – 1800 11 1188
Anchor Switches – 1800 22 7979
Blue Star – 1800 22 2200
Bose Audio – 1800 11 2673
Bru Coffee Vending Machines – 1800 44 7171
Daikin Air Conditioners – 1800 444 222
DishTV – 1800 12 3474
Faber Chimneys – 1800 21 4595
Godrej – 1800 22 5511
Grundfos Pumps – 1800 33 4555
LG – 1901 180 9999
Philips – 1800 22 4422
Samsung – 1800 113 444
Sanyo – 1800 11 0101
Voltas – 1800 33 4546
WorldSpace Satellite Radio – 1800 44 5432

Hotel Reservations Toll Free Phone Numbers :
GRT Grand – 1800 44 5500
InterContinental Hotels Group – 1800 111 000
Marriott – 1800 22 0044
Sarovar Park Plaza – 1800 111 222
Taj Holidays – 1800 111 825

Insurance Toll Free Phone Numbers :
AMP Sanmar – 1800 44 2200
Aviva – 1800 33 2244
Bajaj Allianz – 1800 22 5858
Chola MS General Insurance – 1800 44 5544
HDFC Standard Life – 1800 227 227
LIC – 1800 33 4433
Max New York Life – 1800 33 5577
Royal Sundaram – 1800 33 8899
SBI Life Insurance – 1800 22 9090

Mattresses Toll Free Phone Numbers :
Kurl-on – 1800 44 0404
Sleepwell – 1800 11 2266

Investments/Finance Toll Free Phone Numbers :
CAMS – 1800 44 2267
Chola Mutual Fund – 1800 22 2300
Easy IPO’s – 3030 5757
Fidelity Investments – 1800 180 8000
Franklin Templeton Fund – 1800 425 4255
J M Morgan Stanley – 1800 22 0004
Kotak Mutual Fund – 1800 222 626
LIC Housing Finance – 1800 44 0005
SBI Mutual Fund – 1800 22 3040
Sharekhan – 1800 22 7500
Tata Mutual Fund – 1800 22 0101

Paints Toll Free Phone Numbers :Asian Paints Home Solutions – 1800 22 5678
Berger Paints Home Decor – 1800 33 8800


Teleshopping Toll Free Phone Numbers :
Asian Sky Shop – 1800 22 1800
Jaipan Teleshoppe – 1800 11 5225
Tele Brands – 1800 11 8000
VMI Teleshopping – 1800 447 777
WWS Teleshopping – 1800 220 777

Travel Toll Free Phone Numbers :Club Mahindra Holidays – 1800 33 4539
Cox & Kings – 1800 22 1235
God TV Tours – 1800 442 777
Kerala Tourism – 1800 444 747
Kumarakom Lake Resort – 1800 44 5030
Raj Travels & Tours – 1800 22 9900
Sita Tours – 1800 111 911
SOTC Tours – 1800 22 3344

UPS :APC – 1800 44 4272
Numeric – 1800 44 3266

Indian Railways :Indian Railway General Enquiry 131
Indian Railway Central Enquiry 131
Indian Railway Reservation 131
Indian Railway Railway Reservation Enquiry 1345,1335,1330
Indian Railway Centralised Railway Enquiry 1330/1/2/3/4/5/6/7/8/9

Others Important Helplines :Consumer Helpline – 1800 11 4000
loreal garnier – 1800 223 000
KONE Elevator – 1800 444 666
Indane – 1800 44 51 15
Aavin – 1800 44 3300
Pedigree – 1800 11 2121
Kodak India – 1800 22 8877
Domino’s Pizza – 1800 111 123
World Vision India – 1800 444 550
Telecom Monitoring Cell – 1800 110 420

NOTE:- All number are getting from Online Search . If any Number is changed or not worked then , I am not responsible for that.

Wednesday, July 13, 2011

Best Free Email Client

Mozilla_Thunderbird_logoPersonally , I like the most Windows Mail Client which is also a free program , But on the all perspective Mozilla’s Thunderbird is more great Email Client in my opinion.
Thunderbird is a free email application that's easy to set up and customize - and it's loaded with great features!
Thunderbird is award-winning email application from Mozilla.Import your existing mail and enjoy our new features like tabbed email and advanced search.

Download Mozilla Thunderbird 5.0 For Windows
Thunderbird’s all version and all OS download:-http://www.mozilla.org/en-US/thunderbird/all.html

Saturday, July 9, 2011

Using MagicISO to create a Multisession CD and DVD

You are here: Tutorials > Using MagicISO to create a multisession CD and DVD.

1. Start Multisession CD/DVD
  • First, Insert an empty CD or DVD into your recorder.
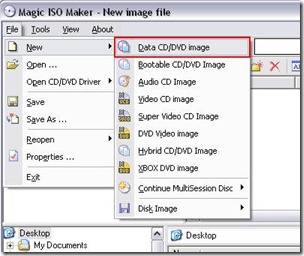
  • Start new compilation by clicking on the Menu "File"->"New"->"Data CD/DVD Image".
    clip_image001
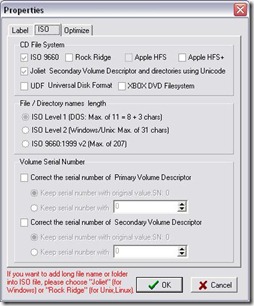
  • Click clip_image002to set the properties of data CD/DVD image.
    clip_image003
    In the "File/Directory names length" section, you can specify the ISO level for the length of the names. ISO Level 1 means that the names cannot be more than 11 characters long for DOS and Windows 3.1(8 for the name and 3 for the extension). ISO Level 2 means that the names can be up to 31 characters long for Windows 95 and higher. ISO Level 2 will be best in most cases - if you know that CD must also be readable on DOS or Windows 3.1 system then you should select ISO level 1. ISO 9660:1999 v2 means that the names can be up to 207 characters long for some Linux and Unix system.
    In the "CD File System" Section, you can specify which CD File system for the data CD. ISO-9660 is a standard CD-ROM file system that allows you to read the same CD-ROM whether you are on the PC UNIX Linunx Mac or other major computer. Joliet is an extension of the ISO 9660 standard, developed by Microsoft to allow CD and DVD to be recorded using long filenames, and using the Unicode international character set. Joliet allows you to use filenames up to 64 characters in length, including space. Rock Ridge is an extension of the ISO 9660 file system designed to support Unix file system information (such as longer filenames and deeper directory structures). Apple HFS/HFS+ is the "Hierarchical File system", the native volume format used on modern Macintosh computers.  with HFS/HFS+ volume format, CD and DVD  can be readable on Mac OS. UDF (Universal Disk Format) is a file system developed by OSTA. With UDF volume format, data can be written to a CD or DVD in the same way as to a hard disk or floppy disk.
    Once you have selected your settings, Click Ok to apply.
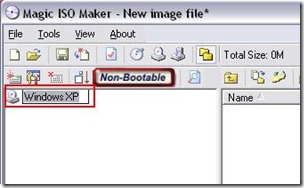
  • Change the root name you can give your CD or DVD and overtype the default name. you can use letter A-Z, digits 0-9 and the underscore character(_).
    clip_image004
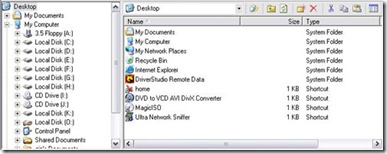
  • If File Browser Panel is not open yet, you can open it by clicking  clip_image005button.
    clip_image006
  • Add files and folders for the CD and DVD using Drag&Drop editing by simply clicking on the required files in the file browser and dragging them into the compilation panel.
    You also can select files and folders in the file browser and add files and folders for the CD and DVD by clicking clip_image007button.
    When adding directories, the directory structure is moved across too, i.e. if you drag an entire folder into the compilation panel, the folder will be created on the CD you wish to burn.
    If you drag a lot of individual files however this may affect the clarity of the CD's contents. To avoid this you can create new folders within the compilation panel by clicking clip_image008button. The folder you have just created is assigned the name "New Folder" by default and can be renamed immediately.
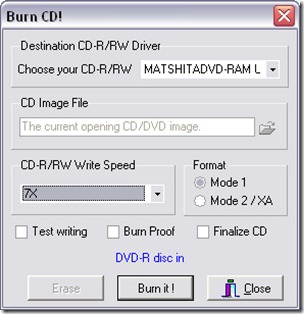
  • Click clip_image009to open the burn dialog box.
    clip_image010
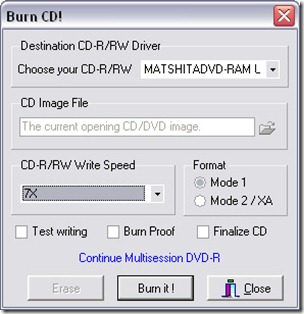
  • Choose your CD/DVD recorder, Choose write speed. Important: you must remember to clear the "Finalize CD" checkbox when creating the first session of a MultiSession CD or DVD. With a Multisession CD or DVD, this checkbox is only checked for the last session of the CD or DVD. This setting write protects the CD or DVD and no further writing is possible.
  • Click "Burn it!" to start the burn process.
2. Continue Multisession CD/DVD
  • Insert the Multisession CD or DVD you wish to continue into the recorder.
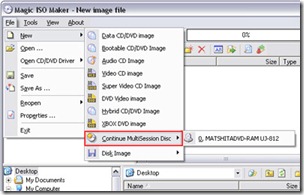
  • Continue Multisession CD or DVD by clicking menu "File"->"Continue Multisession Disc".
    clip_image011
  • Click clip_image002[1]to set the properties of data CD/DVD image.
  • Change the root name you can give your CD or DVD and overtype the default name. you can use letter A-Z, digits 0-9 and the underscore character(_).
  • If File Browser Panel is not open yet, you can open it by clicking  clip_image005[1]button.
  • Add files and folders for the CD and DVD using Drag&Drop editing by simply clicking on the required files in the file browser and dragging them into the compilation panel.
  • Click clip_image009[1]to open the burn dialog box.
    clip_image012
  • Choose your CD/DVD recorder, Choose write speed. Important: you must remember to clear the "Finalize CD" checkbox when continuing the session of a MultiSession CD or DVD. With a Multisession CD or DVD, this checkbox is only checked for the last session of the CD or DVD. This setting write protects the CD or DVD and no further writing is possible.
  • Click "Burn it!" to start the burn process.
3. Finish Multisession CD/DVD
  • Insert the Multisession CD or DVD you wish to continue into the recorder.
  • Continue Multisession CD or DVD by clicking menu "File"->"Continue Multisession Disc".
    clip_image011[1]
  • Click clip_image002[2]to set the properties of data CD/DVD image.
  • Change the root name you can give your CD or DVD and overtype the default name. you can use letter A-Z, digits 0-9 and the underscore character(_).
  • If File Browser Panel is not open yet, you can open it by clicking  clip_image005[2]button.
  • Add files and folders for the CD and DVD using Drag&Drop editing by simply clicking on the required files in the file browser and dragging them into the compilation panel.
  • Click clip_image009[2]to open the burn dialog box.
    clip_image013
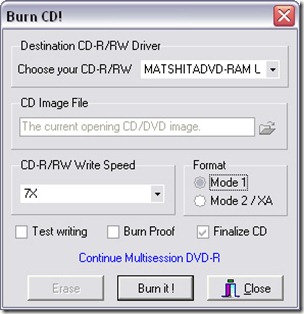
  • Choose your CD/DVD recorder, Choose write speed. Important: please ensure that  the "Finalize CD" checkbox is only active when you create the final session of a MultiSession CD or DVD. Otherwise your CD or DVD will be finalized and write protected. No further writing to the CD or DVD is now possible.
  • Click "Burn it!" to start the burn process.
Complete guide of Burn Multisession Iso Image

Monday, July 4, 2011

Crysis 2 Theme For Windows 7 (HD)

Crysis 2 Windows 7 theme with customized sound.


Crysis 2 (3)

Crysis 2 Theme for Windows 7 For Widescreen specially
without viruses and without any problem. you can also
download this theme from:-

NOTE:- Links Update on 04-Jan-2013

Download Link (Ad Free Links ):- Winking smile

Link 1

Link 2

Link 3

Link 4

Link 5

Friday, July 1, 2011

Game for Windows Live Offline Profile

Walk-through for GFWL ‘offline profile’ sign-in process for DIRT 2
Start the game and Choose “Yes” when you see the screen “SIGN IN? You’re not currently signed into a gamer profile. If you don’t sign in you won’t be able to save game progress or access online modes. Sign in now?” (See picture below)


clip_image002


Now choose “Create New Profile”
clip_image004


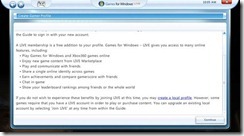
You will now see the “Create Gamer Profile” Screen, just scroll down and select “create a local profile””
clip_image006


Scroll down and select “create a local profile” and click “Continue”
clip_image008


Enter a Profile Name and click “Submit”
clip_image010


That’s It, You now have and offline GFWL Profile and can save your progress in the game. Just click ‘Done”, then exit GFWL and start playing.

clip_image012

clip_image014

Download Whole Guide:-
http://ge.tt/9yAbab5?c

Monday, June 27, 2011

Run Command Shortcuts


I know there are a lot of people who love using the run prompt or the
command prompt rather than using the mmc control...
So here are some quick tips that you can use ... Enjoy...
List big, but still i hope it is useful!!

* Accessibility Controls : access.cpl
* Add Hardware Wizard : hdwwiz.cpl
* Add/Remove Programs : appwiz.cpl
* Administrative Tools : control admintools
* Automatic Updates : wuaucpl.cpl
* Bluetooth Transfer Wizard : fsquirt
* Calculator : calc
* Certificate Manager : certmgr.msc
* Character Map : charmap
* Check Disk Utility : chkdsk
* Clipboard Viewer : clipbrd
* Command Prompt : cmd
* Component Services : dcomcnfg
* Computer Management : compmgmt.msc
* Date and Time Properties : timedate.cpl
* DDE Shares : ddeshare
* Device Manager : devmgmt.msc
* Direct X Control Panel (If Installed)* : directx.cpl
* Direct X Troubleshooter : dxdiag
* Disk Cleanup Utility : cleanmgr
* Disk Defragment : dfrg.msc
* Disk Management : diskmgmt.msc
* Disk Partition Manager : diskpart
* Display Properties : control desktop
* Display Properties : desk.cpl
* Display Properties (w/Appearance Tab Preselected) : control color
* Dr. Watson System Troubleshooting Utility : drwtsn32
* Driver Verifier Utility : verifier
* Event Viewer : eventvwr.msc
* File Signature Verification Tool : sigverif
* Findfast : findfast.cpl
* Folders Properties : control folders
* Fonts : control fonts
* Fonts Folder : fonts
* Free Cell Card Game : freecell
* Game Controllers : joy.cpl
* Group Policy Editor (XP Prof) : gpedit.msc
* Hearts Card Game : mshearts
* Iexpress Wizard : iexpress
* Indexing Service : ciadv.msc
* Internet Properties : inetcpl.cpl
* IP Configuration (Display Connection Configuration) : ipconfig
/all
* IP Configuration (Display DNS Cache Contents) : ipconfig

/displaydns
* IP Configuration (Delete DNS Cache Contents) : ipconfig /flushdns
* IP Configuration (Release All Connections) : ipconfig /release
* IP Configuration (Renew All Connections) : ipconfig /renew
* IP Configuration (Refreshes DHCP & Re-Registers DNS) : ipconfig

/registerdns
* IP Configuration (Display DHCP Class ID) : ipconfig /showclassid
* IP Configuration (Modifies DHCP Class ID) : ipconfig /setclassid
* Java Control Panel (If Installed) : jpicpl32.cpl
* Java Control Panel (If Installed) : javaws
* Keyboard Properties : control keyboard
* Local Security Settings : secpol.msc
* Local Users and Groups : lusrmgr.msc
* Logs You Out Of Windows : logoff
* Microsoft Chat : winchat
* Minesweeper Game : winmine
* Mouse Properties : control mouse
* Mouse Properties : main.cpl
* Network Connections : control netconnections
* Network Connections : ncpa.cpl
* Network Setup Wizard : netsetup.cpl
* Notepad : notepad
* Nview Desktop Manager (If Installed) : nvtuicpl.cpl
* Object Packager : packager
* ODBC Data Source Administrator : odbccp32.cpl
* On Screen Keyboard : osk
* Opens AC3 Filter (If Installed) : ac3filter.cpl
* Password Properties : password.cpl
* Performance Monitor : perfmon.msc
* Performance Monitor : perfmon
* Phone and Modem Options : telephon.cpl
* Power Configuration : powercfg.cpl
* Printers and Faxes : control printers
* Printers Folder : printers
* Private Character Editor : eudcedit
* Quicktime (If Installed) : QuickTime.cpl
* Regional Settings : intl.cpl
* Registry Editor : regedit
* Registry Editor : regedit32
* Remote Desktop : mstsc
* Removable Storage : ntmsmgr.msc
* Removable Storage Operator Requests : ntmsoprq.msc
* Resultant Set of Policy (XP Prof) : rsop.msc
* Scanners and Cameras : sticpl.cpl
* Scheduled Tasks : control schedtasks
* Security Center : wscui.cpl
* Services : services.msc
* Shared Folders : fsmgmt.msc
* Shuts Down Windows : shutdown
* Sounds and Audio : mmsys.cpl
* Spider Solitare Card Game : spider
* SQL Client Configuration : cliconfg
* System Configuration Editor : sysedit
* System Configuration Utility : msconfig
* System File Checker Utility (Scan Immediately) : sfc /scannow
* System File Checker Utility (Scan Once At Next Boot) : sfc

/scanonce
* System File Checker Utility (Scan On Every Boot) : sfc /scanboot
* System File Checker Utility (Return to Default Setting) : sfc

/revert
* System File Checker Utility (Purge File Cache) : sfc /purgecache
* System File Checker Utility (Set Cache Size to size x) : sfc

/cachesize=x
* System Properties : sysdm.cpl
* Task Manager : taskmgr
* Telnet Client : telnet
* User Account Management : nusrmgr.cpl
* Utility Manager : utilman
* Windows Firewall : firewall.cpl
* Windows Magnifier : magnify
* Windows Management Infrastructure : wmimgmt.msc
* Windows System Security Tool : syskey
* Windows Update Launches : wupdmgr
* Windows XP Tour Wizard : tourstart
* Wordpad : write