Sunday, May 27, 2012

Airtel and Reliance Service Codes & Secret Codes

28 Awesome Airtel Codes :
# To Do The Code What Code Does
1 Call 121 Customer Care
2 Call 1909 Activate or Deactivate DND Service
3 Dial *123# Balance Enquiry
4 Dial *121*5# Deactivating Services
5 Dial *555# NOP Service
6 Dial *222# Special 5 Offers
7 Dial *141# Airtel Gift Service
8 Dial *325# Free Facebook Access 1Rs./Day
9 Dial *515# Twitter Service
10 Dial *121# Airtel my Offers
11 Dial *123*7# and *123*10# Checking GPRS Balances
12 Dial *125*5# Daily GPRS Pack 5Rs./Day
13 Dial *567# MO Activation or Deactivation
14 Dial 198 Lodging Complaints
15 Dial 123 Recharging Account
16 Dial *566# Must Buy Service
17 Dial 198p2p1p4p2 Direct Calling Customer Care
18 Dial *123*11# Checking 3G Data Balance
19 Send All to 543210 GPRS Settings
20 Send LIVE to 52567 Airtel Live Settings
21 Send MRP FULLTT to 51619 Full Talk-time Offers
22 Send MRP TRF to 51619 Tariff Plans
23 Send MRP SMS to 51619 SMS Packs
24 Send MRP GPRS to 51619 GPRS Packs
25 Send 3G to 121 Activating 3G Packs
26 Send START to 121/1210 Start Any Service
27 Send STOP to 121/1210 Stop Any Service
28 Send PORT to 1900 Mobile Portability Service
Airtel

Secret Network Codes For Reliance

To check main balance & validity,dial .:
*333*1*1*1#

Check last recharge detail .: *333*1*2*1#

Check internet data & validity .: *333*1*3*1#

Check vas balance .: *333*1*4*1#

Act callertune .: *333*3*1*1#

Deactivate callertune .: *333*3*1*2#

Activate miss call alert .: *333*3*2*1#

Deactivate miss call alert .: *333*3*2*2#
*222#
also working


Friday, May 25, 2012

How to Change, Add, or Remove Startup Programs in Windows 7


METHOD ONE

Through the Program Itself NOTE: Some programs may have a setting in them to allow it to run at startup or not. You will need to consult the program's documentations on how to do this specifically for their program if it is available for that program.
1. Open the program's settings menu.
2. To Add the Program to Startup -
A) Select the program's Run at startup type option.
3. To Remove the Program from Startup -
A) Unselect the program's Run at startup type option.
METHOD TWO

Through the Startup Folder NOTE: You can add or remove shortcuts to programs or files from the Startup folder to have them run or open at the startup of Windows 7.
1. Right click on the exe file of the program you want to run at startup, or file to open at startup, and click onCreate Shortcut.
NOTE: This is the shortcut that you will add to the Startup folder in either Option One or Option Two below. Skip this step if you are only removing a shortcut from the Startup folder.
A) Do either OPTION ONE "Current User" or OPTION TWO "All Users" below for what you want.
OPTION ONE

For Current Single User Only NOTE: The single (current) user Startup folder is a hidden system folder located at:
C:\Users\(User-Name)\AppData\Roaming\Microsoft\Windows\Start Menu\Programs\Startup
2. Open the Start Menu.
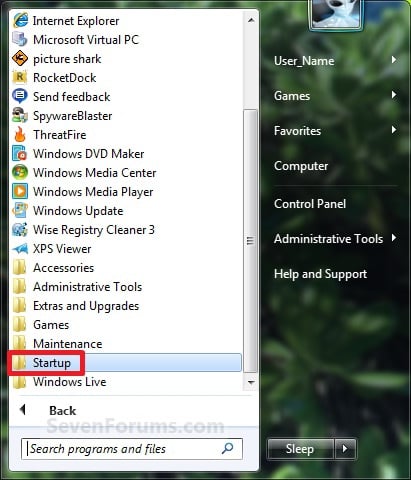
3. Click on All Programs, right click on the Startup folder, and click on Open orExplore. (See screenshot below)
Startup Programs - Change-start_menu_startup_folder.jpg
A) Go to step 5.
OR
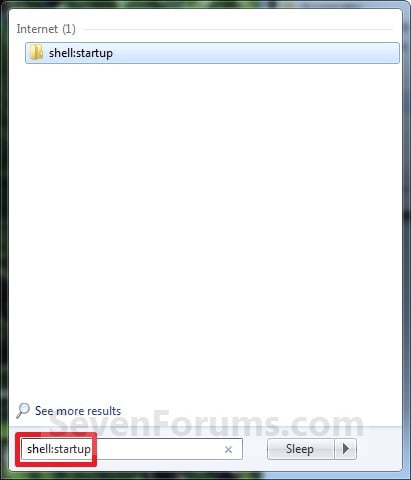
4. In the Start Menu search line, type shell:startup and press Enter. (See screenshot below)
Startup Programs - Change-start_menu_shell-startup.jpg
5. To Add a Startup Program or File Shortcut
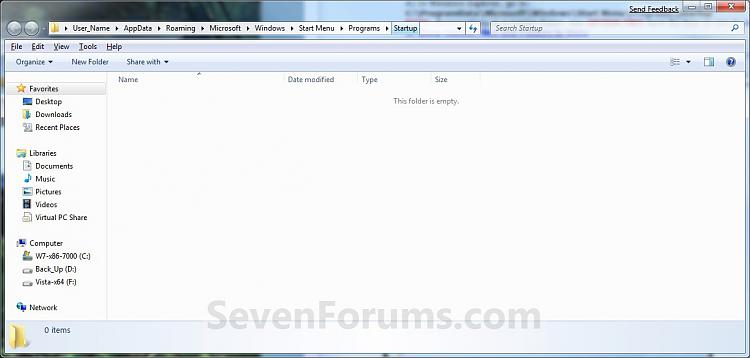
A) Drag the shortcut created from step 1 to inside the Startup folder and drop it. (See screenshot below)
Startup Programs - Change-startup_folder.jpg
6. To Remove a Startup Program or File Shortcut
A) Right click on the shortcut in the Startup folder and click on Delete. (See screenshot above)
7. Close the Startup folder when done. (See screenshot below step 5A)
OPTION TWO

For All Users NOTE: The all users Startup folder is a hidden system folder located at:
C:\ProgramData\Microsoft\Windows\Start Menu\Programs\Startup
2. Open the Start Menu.
3. Click on All Programs, right click on the Startup folder, and click on Open All Users or Explore All Users. (See screenshot below)
Click image for larger version<br /><br />Name: Start_Menu_Startup_Folder.jpg<br />Views: 10213<br />Size: 127.5 KB<br />ID: 2156
4. To Add a Startup Program or File Shortcut
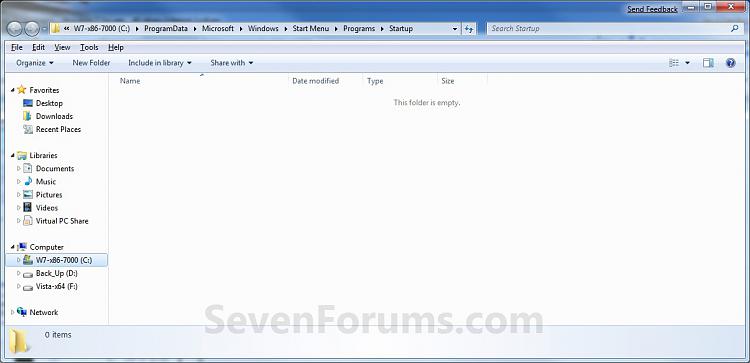
A) Drag the shortcut created from step 1 to inside the Startup folder and drop it. (See screenshot below)
Startup Programs - Change-startup_folder_all.jpg
5. To Remove a Startup Program or File Shortcut
A) Right click on the shortcut in the Startup folder and click on Delete. (See screenshot above)
6. Close the Startup folder when done. (See screenshot below step 4A)

METHOD THREE

Through System Configuration (msconfig) NOTE: Using the Selective Startup option in System Configuration (msconfig), you can enable or disable startup programs. You will need to be logged into an administator account, or provide the administrator password to open System Configuration.
WARNING: It would be best to also check the registry entries in METHOD FOUR below as well, since msconfig may not always show all startup programs.
1. Open the Start Menu.
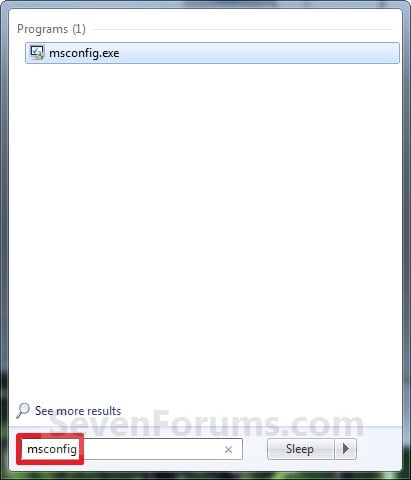
A) In the search line, type msconfig and press Enter. (See screenshot below)
Startup Programs - Change-start_menu_msconfig.jpg
B) Go to step 3.
OR
2. Open the Control Panel (All items view) and click on the Administrative Tools icon, then click on System Configuration. Close the Control Panel and Administrative Tools windows.
3. If prompted, click on Continue for the UAC prompt, or type in the administrator's password.
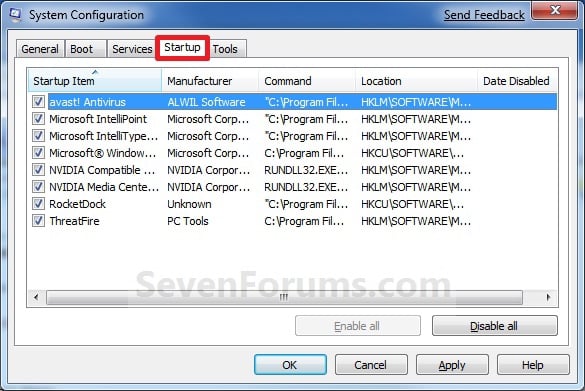
4. Click on the Startup tab. (See screenshot below)
Tip
If you look under the Location column for the Start Item, you will see the registry location for it that you can use to remove the startup item using METHOD FOUR below instead.
Startup Programs - Change-system_configuration_startup_tab.jpg
5. To Disable a Startup Program
A) Select a listed startup program and uncheck it. (See screenshot above)
B) Repeat to disable anymore listed startup programs.
6. To Enable a Startup Program
A) Select a listed startup program and check it. (See screenshot below step 4)
B) Repeat to enable anymore listed startup programs.
7. To Disable All Listed Startup Programs
A) Click on the Disable all button. (See screenshot below step 4)
B) Go to step 9.
8. To Enable All Listed Startup Programs
A) Click on the Enable all button. (See screenshot below step 4)
9. Click on Apply. (See screenshot below step 4)
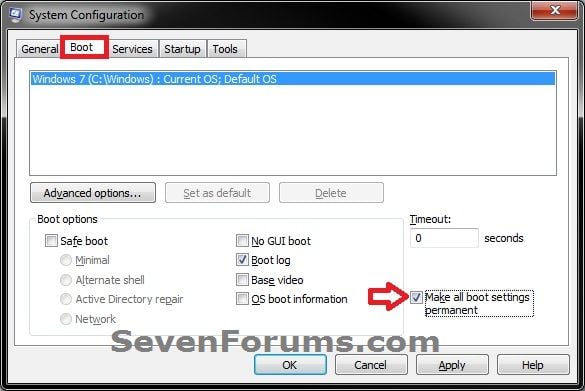
10. Click on the Boot tab, then check the Make all boot settings permanent box and click onOK. (See screenshot below)
Startup Programs - Change-boot-1.jpg
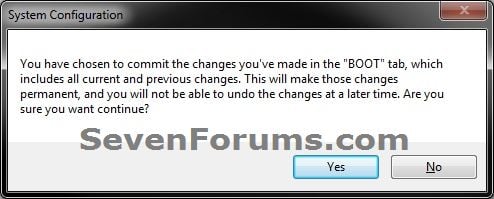
11. Click on Yes. (See screenshot below)
Startup Programs - Change-boot-2.jpg
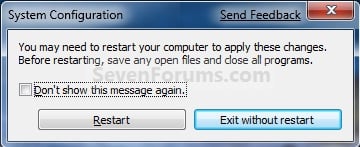
12. Click on the Restart button to apply. (See screenshot below)
WARNING: This will restart your computer immediately. Save and close anything that you are working on first.
Startup Programs - Change-restart.jpg
METHOD FOUR

Manually in Registry Editor NOTE: This will allow you to remove a startup program for either the current single user or all users. If you wanted to add a startup program, then METHOD TWO above would be a safer and easier way to do so.
1. Open the Start Menu.
2. In the search line, type regedit and press Enter. (See screenshot below)
Startup Programs - Change-start_menu_regedit.jpg
3. For "Current User" Only Locations
A) In regedit, go to: (See screenshots below)
HKEY_CURRENT_USER\Software\Microsoft\Windows\CurrentVersion\Run
AND
HKEY_CURRENT_USER\Software\Microsoft\Windows\CurrentVersion\RunOnce
Startup Programs - Change-current_reg_run.jpg
Startup Programs - Change-current_reg_runonce.jpg
4. For "All Users" Locations
A) In regedit, go to: (See screenshots below)
For 32-bit and 64-bit Windows 7:
HKEY_LOCAL_MACHINE\SOFTWARE\Microsoft\Windows\CurrentVersion\Run
AND
HKEY_LOCAL_MACHINE\SOFTWARE\Microsoft\Windows\CurrentVersion\RunOnce
AND (If added by Group Policy)
HKEY_CURRENT_USER\Software\Microsoft\Windows\CurrentVersion\Policies\Explorer\Run
AND (If added by Group Policy)
HKEY_LOCAL_MACHINE\SOFTWARE\Microsoft\Windows\CurrentVersion\Policies\Explorer\Run
AND
For 64-bit Windows 7 only:
HKEY_LOCAL_MACHINE\SOFTWARE\Wow6432Node\Microsoft\Windows\CurrentVersion\Run
AND
HKEY_LOCAL_MACHINE\SOFTWARE\Wow6432Node\Microsoft\Windows\CurrentVersion\RunOnce
Startup Programs - Change-all_users_reg_run.jpg
Startup Programs - Change-all_users_reg_runonce.jpg
5. In the right pane of Run and/or RunOnce, right click on the startup program you want to remove and click on Delete. (See screenshots above)
NOTE: RunOnce is only to run the program once for the next time that Windows 7 starts up.Run is to run the program everytime that Windows 7 starts up.
6. Click on Yes to confirm deletion.
7. When done, close regedit.
METHOD FIVE

Using CCleaner
1. If you have not already, download and install the free program CCleaner.
2. Open CCleaner, and click on the Tools icon (left side) and on the Startup button. (See screenshot below)
Startup Programs - Change-ccleaner.jpg
3. Select a startup item, then either enable, disable, or delete it from the Vista startup programs list. (See screenshot above)
METHOD SIX

Through Task Scheduler Note
By default, you cannot run a elevated (Run as administrator) program that requires UAC permission at startup using the normal Windows 7 startup programs above.
For a Administrator User Account:
You can have Run as administrator (elevated) programs run at startup for a administrator account by running it in a startup task in Task Scheduler.
For a Standard User Account:
You will not be able to run elevated programs at startup for a standard user account though. Only unelevated programs (ex: Notepad).

Add Startup Program in Windows 7


Thursday, May 10, 2012

5 - Five Best Email Clients

Email as a technology has been around for decades, and thanks to wide spread adoption and popularity, it isn't in danger of disappearing. Check out the five most popular email clients to help you wrangle your email.
Earlier this week we asked your to share your favorite email client. We didn't restrict the voting to only stand-alone email applications or web-based email clients, but we did specify that if you voted for a web-based tool it had to have distinctly client-like features—such as Gmail's ability to fetch and sort email from other sources. The email Call for Contenders was one of the most popular we've ever had, with over 1,000 votes logged. Here are the five most popular clients used by Lifehacker readers:
Outlook - (Windows, $399 for Office Standard Suite)
Five Best Email Clients
Outlook has been around since the 1990s, and by virtue of being part of the Microsoft Office suite and having been entrenched in the business environment, it enjoys an enormous popularity. Even if many people use Outlook because it's the email client provided—and often required!—by their place of employment, that doesn't mean it can't stand on its own merits. Integration with Windows Desktop Search gives you the ability to quickly search through your entire Outlook workflow, and Outlook can handle everything from your email to your calendar and easily transfer tasks, contacts, and more between the two.
Apple Mail - (Mac, Free)
Five Best Email Clients
Apple's Mail application, also known as Mail.app or simply Mail, unsurprisingly continues the tradition of Apple applications following the "it just works" method of design. Mail allows you to collect all your email from across the web and various email servers in one place, and it actively engages your email as you read it. For example, if you get an email with an invitation to a meeting next Thursday, Mail will detect it and make it simple to kick that appointment right over to iCal. Like the integration between Windows Desktop Search and Outlook, Mail is integrated with Spotlight to make deep massaging your messages easy.
Thunderbird - (Windows/Mac/Linux, Free)
Five Best Email ClientsThunderbird is an open-source offering from Mozilla—the company behind the beloved open-source browser Firefox. Thunderbird is a solid email application that sports the same extensibility of its code-sibling Firefox. Many readers voted for not just Thunderbird but Thunderbird with the addition of Lightning, a Thunderbird extension that adds scheduling and task management functionality to Thunderbird. If you're interested in using Thunderbird you'll definitely want to check out our guide to making Thunderbird your ultimate online/offline messaging hub, and you may also want to consider packing Thunderbird Portable away on your thumb drive for anywhere-access to your email.
Gmail - (Web-based, Free)
Five Best Email Clients
Google has had quite a hit on their hands with Gmail, their extremely popular web-based email client. Not only do you get a feature-packed email account when you sign up for Gmail—you also get an email client that's is very adept at pulling in email from other services and organizing it with a robust system of filters and tags. You can check out how to manage multiple inboxes here if you'd like to use Gmail as a central hub for managing all your email. Many of the features in Gmail aren't necessarily revolutionary—like the ability to filter messages, flag, or label them—but the features are implemented in such a way that makes them effortless to use. And, surprising as it may seem, its much-loved threaded conversations are still relatively unique to Gmail.
Postbox - (Windows/Mac, $39.95)
Five Best Email Clients
Postbox is stand-alone email client for Windows and Mac operating systems. Postbox is based on Mozilla-code, so the Postbox team has been able to tweak quite a few Thunderbird extensions, including Lightning, to work with Postbox. In addition to its extensibility, Postbox's default interface is powerful. The app includes features like the ability to search and compose simultaneously. You can look up an email address, search for a previous attachment, and check an old email for information all in the sidebar while working on your current email. Postbox also provides email summaries as you read through and search your email, showing you not just the sender and subject line but the attachments and any important information inside the email like addresses, appointments, and URLs.
Source:- lifehacker.com