Your documents, spreadsheets, and presentations cry out for great images--a creative company logo, compelling charts, and luscious photos. Microsoft's Office applications have cool tools for using images in your documents, but these features aren't immediately obvious.
In this article, I’ll share some tips and tricks for dressing up images in your Office work, from replacing Excel chart columns with stacked images, to creating a simple one-click image animation in PowerPoint, to making circle and heart-shaped images in Microsoft Word.
These instructions are designed for Office 2010, but earlier editions of Office have similar tools.
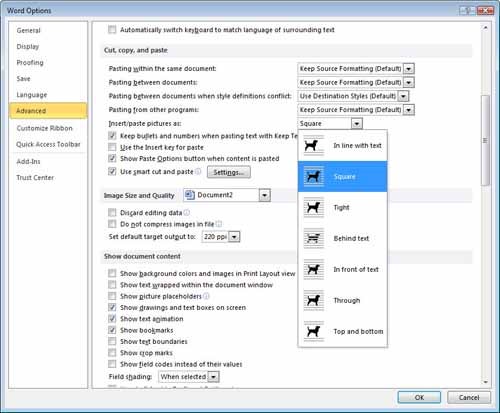
Adjust these settings to ensure that text wraps around all of your images in Word.Word 2010 includes the new graphics engine that Excel 2007 and PowerPoint 2007 had, but Word 2007 did not.
Annoyingly, however, Word continues to insert images as "in line with text"--the one setting you'll probably never want to use unless you're inserting an image into a table cell. This setting makes images behave like text characters so they don’t move around the page properly. You can rotate the images, but the text doesn’t wrap around them properly, so you'll have to change the image wrap setting before you can continue.
Rather than configuring the wrap setting for each individual image, I suggest that you change the Word setting that controls how images are inserted. To do this, before you insert an image, choose File, Options, Advanced. From the Cut, Copy, and Paste options, locate Insert/Paste Picture As and set it to anything except 'In line with text'. I recommend the Square option as a good choice. Next, click OK.
In the future, when you insert an image into a Word document, text will wrap around the image neatly. You can change this, if necessary, for a particular image, but most of the time this is the exact setting you'll want.
If you prefer, you can change the settings for each individual image after you have inserted it into your document. To do this, click the image to select it, choose Picture Tools, Format, and then click the Wrap Text dropdown list. From here you can select a wrapping option; again, Square is a good choice.
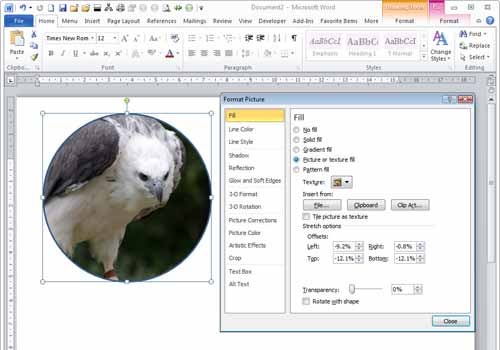
Break images out of their square boxes.You can create an image embedded in nearly any kind of shape in Microsoft Word. To see this feature at work, choose Insert, Shapes and select a shape--say, the ellipse. Hold the Shift key as you do this, to draw a perfect circle. Once you've selected the shape, the Drawing Tools tab appears. From the Format tab, select Shape Fill, Picture; select a picture to use; and clickInsert. You can do this with any built-in shape. You can also create your own custom shapes by using the Curve or Freeform tools and then fill them with images, too.
If your image looks out of proportion inside the shape, select the shape, right-click it, and choose Format Shape. Click the Crop option and, if your image is stretched so that everything is taller than it should be, increase the Picture Position: Width setting. Likewise, if the image is stretched so that it is wider than it should be, increase the Picture Position: Height setting. If you increase both the Width setting and the Height setting, you can adjust the position of the image in the shape by using the Offset options. Deselect Rotate with Shape if you want the image to remain horizontal even if you rotate the shape.
Click one of the Fill options in the 'Picture or texture fill area' to alter the image transparency inside the shape.
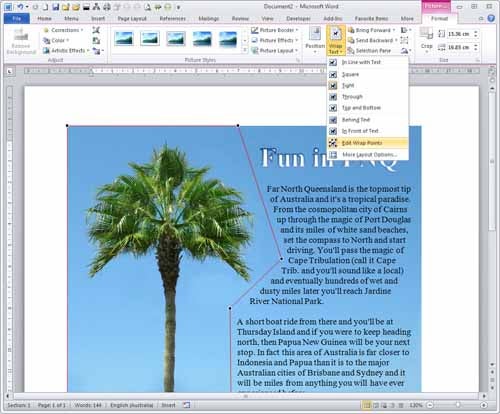
Add nodes to cause wrapping text to follow the contours of an image.When you have an image's wrap set to Square or to Tight, the text will wrap around the image. As most images are rectangular, the wrap will be a rectangle too, but you can change this if you wish. Select the image, choose Picture Tools, Format, and then select Wrap Text, Edit Wrap Points.
By adjusting the nodes that control how text wraps around the image, you can set text to flow across the image or keep it away from the image edge on one or more sides. To add more nodes, click and drag anywhere on the line. To remove a node, hold down the Control key and click the node.
When you’re done, click outside the marquee area to make the handles disappear. To apply the same feature to a shape filled with an image, select the shape, choose Drawing Tools, Format, and then select Edit Shape, Edit Points.
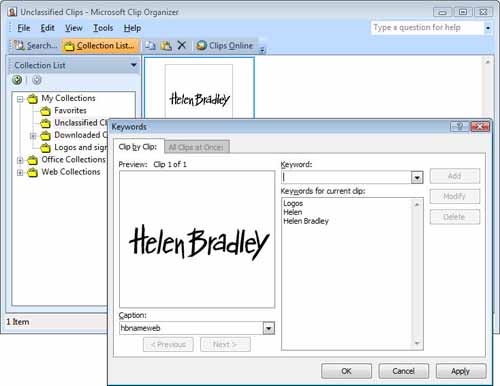
It's a snap to create your own embeddable images and signatures.It's easy to add an image of your company logo or your scanned signature as a clip art image. To do this, choose Start, Programs, Microsoft Clip Organizer, and then choose File, Add Clips to Organizer, On My Own. Next, browse to find the file that contains your signature or logo, and click Add.
From the dropdown list to the right of the image, select Edit keywords and then add keywords to the image to help you locate it in future. Click Apply to apply the changes; to finish, click OK and close the Clip Organizer.
In the future, to add the logo or signature to a document, choose Insert, Clip Art; type one of the keywords that you added to the image; disable Include Office.com content; select Illustrations and Photographs; and click Go. When the image appears in the panel, click it to insert it into your document.
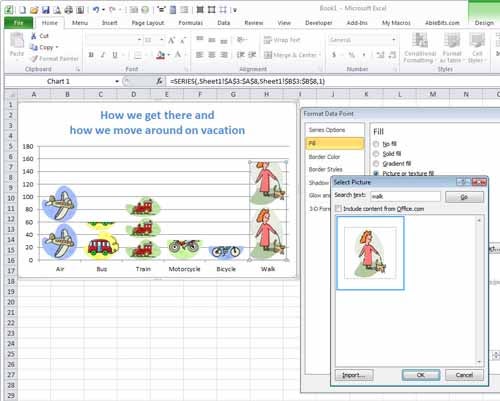
Replacing basic bars in charts with images gets your point across at a glance.Instead of filling your 2D column or bar charts with solid colors or boring patterns, you can fill them with images. To do this, select the column or bar that you want to change, and right-click the mouse. Choose Format Data Series, Fill and select Picture or texture fill. Select an image to use from your disk, your Clip Art collection, or from the Clipboard. Simple line-art images are a good choice. Click Stacked to ensure that the images are stacked and not stretched, and clickClose.
You can add a single image to an entire data series, or you can click a single bar or column and use Format Data Point to add a different image to each column or bar.
 D
D
ress up charts with custom background images.In addition to replacing bars and columns, you can add a picture behind a chart or behind the plot area of a chart. To do this, click the chart somewhere, and then choose Chart Tools,Layout. From the dropdown list in the upper left corner of the ribbon toolbar, choose Chart Areaor Plot Area, as desired. Click the Format Selection link immediately below this selector; chooseFill, Picture or Texture Fill; and select an image to use. Here you can alter the transparency of the image if you wish so that the chart is visible through the image. Finally, click Close.
If you add an image to the Chart Area and if your Plot Area has a solid fill, you won't be able to see the image underneath. To correct this problem, repeat the process but this time after selecting Plot Area, Format Selection, choose Fill, No Fill. Alternatively, choose Solid Fill, pick a fill color, and then set the Transparency to a high value.
 You can add a logo or header to an Excel chart printout in a few simple steps.You can easily add your company logo or other image to the header of an Excel worksheet so that it prints on every page of the sheet. To do this, choose Insert, Header & Footer and then click one of the boxes at the top of the sheet. Click the Picture button, and choose an image to insert.
If the image is larger than the header, it will appear around and below the worksheet, so checking its size is a crucial step. To do this, click I and enable the Lock Aspect Ratio checkbox so that the image will be scaled in proportion.
Now, set its Height value to around 0.75 inch or to a size that will fit in the header area. To check the result, choose View, Page Layout. To adjust the header margin to make it bigger, choosePage Layout, Margins, Custom Margins, and set the Header Margin value; or drag downward on the marker in the vertical ruler to enlarge it.
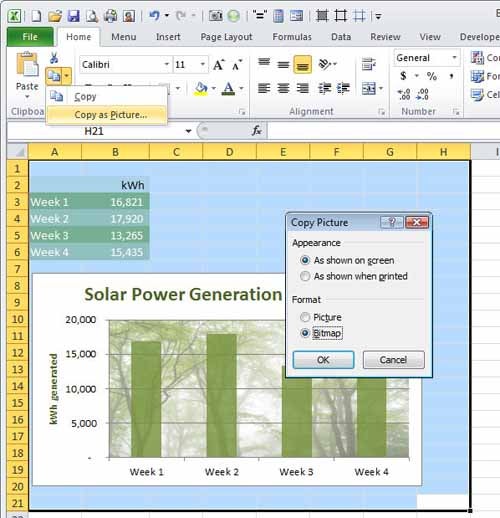
Turn your Excel sheet into a thumbnail.If you need a picture of a worksheet or a chart--to use as a thumbnail or in a cover page, for instance--you can do this from inside Excel. Start by selecting the data range in the cells you want to convert to a picture. In the case of a chart, select the chart itself. From the Copy dropdown list on the Home tab of the ribbon toolbar, select Copy as Picture.
You can then choose to capture the image either as it appears on the screen or as it will appear when printed. Select Picture or Bitmap if those options are available, and then click OK. Now you can paste the picture into the application of your choice.
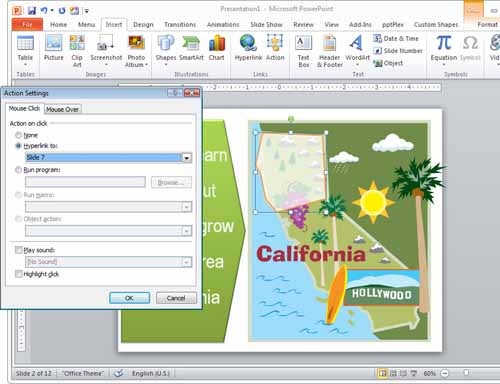
Break up PowerPoint images into clickable sections.If you place an image on a PowerPoint slide, you can add clickable hotspots to it, much as you might create a clickable image map for a website. Start by adding an image to a blank slide: Choose Insert, Shapes and select a shape that suits what you want to make clickable. Draw the shape over the image.
Once again select Drawing Tools, Format, followed by Shape Fill, No Fill, and then Shape Outline, No Outline, so that the shape is not visible. With the shape still selected, choose Insert,Action and select the action that you want to occur when the user clicks the shape--such as going to a different slide or to a URL. Select Highlight Click, and click OK.
You can add multiple clickable shapes to this slide and test them by running the presentation. When you hold your mouse over a clickable area and click, the action will take place.
If you like, you can arrange for shapes to be colored in or partially transparent, to have outlines, and even to include text prompts.
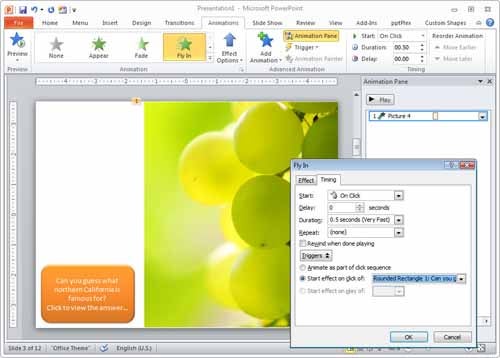 An animation in PowerPoint can keep your presentation lively.To create a simple animation in PowerPoint, first add a shape and a picture to a slide. SelectAnimations, click the picture, and then click an option such as Fly In.
Click the Animation Pane button. From the pane, click the dropdown list that appears beside the picture animation entry. Choose Effect Options. From the Timing tab, click Triggers, select Start Effect, select the shape name in the list, and click OK. When you play the slide, the picture won't appear until you click the shape.
There are lots of hidden secrets for working with graphics inside Microsoft Office applications. Using these tips and tricks, you can achieve a range of effects when illustrating your business presentations, worksheets, and documents with images.
Source Link:- Click Here
In this article, I’ll share some tips and tricks for dressing up images in your Office work, from replacing Excel chart columns with stacked images, to creating a simple one-click image animation in PowerPoint, to making circle and heart-shaped images in Microsoft Word.
These instructions are designed for Office 2010, but earlier editions of Office have similar tools.
1. Tame Word's Bad Image Behavior
Adjust these settings to ensure that text wraps around all of your images in Word.Word 2010 includes the new graphics engine that Excel 2007 and PowerPoint 2007 had, but Word 2007 did not.
Annoyingly, however, Word continues to insert images as "in line with text"--the one setting you'll probably never want to use unless you're inserting an image into a table cell. This setting makes images behave like text characters so they don’t move around the page properly. You can rotate the images, but the text doesn’t wrap around them properly, so you'll have to change the image wrap setting before you can continue.
Rather than configuring the wrap setting for each individual image, I suggest that you change the Word setting that controls how images are inserted. To do this, before you insert an image, choose File, Options, Advanced. From the Cut, Copy, and Paste options, locate Insert/Paste Picture As and set it to anything except 'In line with text'. I recommend the Square option as a good choice. Next, click OK.
In the future, when you insert an image into a Word document, text will wrap around the image neatly. You can change this, if necessary, for a particular image, but most of the time this is the exact setting you'll want.
If you prefer, you can change the settings for each individual image after you have inserted it into your document. To do this, click the image to select it, choose Picture Tools, Format, and then click the Wrap Text dropdown list. From here you can select a wrapping option; again, Square is a good choice.
2. Insert Images into a Circle, a Heart, or Any Shape
Break images out of their square boxes.You can create an image embedded in nearly any kind of shape in Microsoft Word. To see this feature at work, choose Insert, Shapes and select a shape--say, the ellipse. Hold the Shift key as you do this, to draw a perfect circle. Once you've selected the shape, the Drawing Tools tab appears. From the Format tab, select Shape Fill, Picture; select a picture to use; and clickInsert. You can do this with any built-in shape. You can also create your own custom shapes by using the Curve or Freeform tools and then fill them with images, too.
If your image looks out of proportion inside the shape, select the shape, right-click it, and choose Format Shape. Click the Crop option and, if your image is stretched so that everything is taller than it should be, increase the Picture Position: Width setting. Likewise, if the image is stretched so that it is wider than it should be, increase the Picture Position: Height setting. If you increase both the Width setting and the Height setting, you can adjust the position of the image in the shape by using the Offset options. Deselect Rotate with Shape if you want the image to remain horizontal even if you rotate the shape.
Click one of the Fill options in the 'Picture or texture fill area' to alter the image transparency inside the shape.
3. Wrap Text Around or Through an Image
Add nodes to cause wrapping text to follow the contours of an image.When you have an image's wrap set to Square or to Tight, the text will wrap around the image. As most images are rectangular, the wrap will be a rectangle too, but you can change this if you wish. Select the image, choose Picture Tools, Format, and then select Wrap Text, Edit Wrap Points.
By adjusting the nodes that control how text wraps around the image, you can set text to flow across the image or keep it away from the image edge on one or more sides. To add more nodes, click and drag anywhere on the line. To remove a node, hold down the Control key and click the node.
When you’re done, click outside the marquee area to make the handles disappear. To apply the same feature to a shape filled with an image, select the shape, choose Drawing Tools, Format, and then select Edit Shape, Edit Points.
4. Use Signatures and Logos as Clip Art
It's a snap to create your own embeddable images and signatures.It's easy to add an image of your company logo or your scanned signature as a clip art image. To do this, choose Start, Programs, Microsoft Clip Organizer, and then choose File, Add Clips to Organizer, On My Own. Next, browse to find the file that contains your signature or logo, and click Add.
From the dropdown list to the right of the image, select Edit keywords and then add keywords to the image to help you locate it in future. Click Apply to apply the changes; to finish, click OK and close the Clip Organizer.
In the future, to add the logo or signature to a document, choose Insert, Clip Art; type one of the keywords that you added to the image; disable Include Office.com content; select Illustrations and Photographs; and click Go. When the image appears in the panel, click it to insert it into your document.
5. Use Picture Charts in Excel
Replacing basic bars in charts with images gets your point across at a glance.Instead of filling your 2D column or bar charts with solid colors or boring patterns, you can fill them with images. To do this, select the column or bar that you want to change, and right-click the mouse. Choose Format Data Series, Fill and select Picture or texture fill. Select an image to use from your disk, your Clip Art collection, or from the Clipboard. Simple line-art images are a good choice. Click Stacked to ensure that the images are stacked and not stretched, and clickClose.
You can add a single image to an entire data series, or you can click a single bar or column and use Format Data Point to add a different image to each column or bar.
6. Add Pictures Behind Charts and Workbooks
Dress up charts with custom background images.In addition to replacing bars and columns, you can add a picture behind a chart or behind the plot area of a chart. To do this, click the chart somewhere, and then choose Chart Tools,Layout. From the dropdown list in the upper left corner of the ribbon toolbar, choose Chart Areaor Plot Area, as desired. Click the Format Selection link immediately below this selector; chooseFill, Picture or Texture Fill; and select an image to use. Here you can alter the transparency of the image if you wish so that the chart is visible through the image. Finally, click Close.
If you add an image to the Chart Area and if your Plot Area has a solid fill, you won't be able to see the image underneath. To correct this problem, repeat the process but this time after selecting Plot Area, Format Selection, choose Fill, No Fill. Alternatively, choose Solid Fill, pick a fill color, and then set the Transparency to a high value.
7. Add Your Logo to an Excel Printout
You can add a logo or header to an Excel chart printout in a few simple steps.You can easily add your company logo or other image to the header of an Excel worksheet so that it prints on every page of the sheet. To do this, choose Insert, Header & Footer and then click one of the boxes at the top of the sheet. Click the Picture button, and choose an image to insert. If the image is larger than the header, it will appear around and below the worksheet, so checking its size is a crucial step. To do this, click I and enable the Lock Aspect Ratio checkbox so that the image will be scaled in proportion.
Now, set its Height value to around 0.75 inch or to a size that will fit in the header area. To check the result, choose View, Page Layout. To adjust the header margin to make it bigger, choosePage Layout, Margins, Custom Margins, and set the Header Margin value; or drag downward on the marker in the vertical ruler to enlarge it.
8. Save a Worksheet as a Picture
Turn your Excel sheet into a thumbnail.If you need a picture of a worksheet or a chart--to use as a thumbnail or in a cover page, for instance--you can do this from inside Excel. Start by selecting the data range in the cells you want to convert to a picture. In the case of a chart, select the chart itself. From the Copy dropdown list on the Home tab of the ribbon toolbar, select Copy as Picture.
You can then choose to capture the image either as it appears on the screen or as it will appear when printed. Select Picture or Bitmap if those options are available, and then click OK. Now you can paste the picture into the application of your choice.
9. Make Image Maps in PowerPoint
Break up PowerPoint images into clickable sections.If you place an image on a PowerPoint slide, you can add clickable hotspots to it, much as you might create a clickable image map for a website. Start by adding an image to a blank slide: Choose Insert, Shapes and select a shape that suits what you want to make clickable. Draw the shape over the image.
Once again select Drawing Tools, Format, followed by Shape Fill, No Fill, and then Shape Outline, No Outline, so that the shape is not visible. With the shape still selected, choose Insert,Action and select the action that you want to occur when the user clicks the shape--such as going to a different slide or to a URL. Select Highlight Click, and click OK.
You can add multiple clickable shapes to this slide and test them by running the presentation. When you hold your mouse over a clickable area and click, the action will take place.
If you like, you can arrange for shapes to be colored in or partially transparent, to have outlines, and even to include text prompts.
10. Create a Simple Image Animation
An animation in PowerPoint can keep your presentation lively.To create a simple animation in PowerPoint, first add a shape and a picture to a slide. SelectAnimations, click the picture, and then click an option such as Fly In. Click the Animation Pane button. From the pane, click the dropdown list that appears beside the picture animation entry. Choose Effect Options. From the Timing tab, click Triggers, select Start Effect, select the shape name in the list, and click OK. When you play the slide, the picture won't appear until you click the shape.
There are lots of hidden secrets for working with graphics inside Microsoft Office applications. Using these tips and tricks, you can achieve a range of effects when illustrating your business presentations, worksheets, and documents with images.
Source Link:- Click Here
No comments:
Post a Comment
Comment here.....